Installed by enterprise policy "Extension is an evil and stubborn adware that are silently appended and make changes to important system settings to make the useless and corrupt system.'s add corrupt records in the Registry Editor, modify the DNS settings, disable manager task and sometimes can even block your active processes too without any prior notification. Installed by enterprise policy "extension is created by criminals in a way that seems legitimate application, but their main motivation is really stealing all your data confidential like passwords, details of account holder, credit card number and other information.
Once installed by enterprise policy 'Extension is installed, can run their infectious code to get re injected every time you restart the system and bring so many malicious activities to make it worse. You will always get annoyed with lots of unwanted pop-ups and fake alerts when working online. Thus, it is recommended to use the automatic removal tool to delete Installed by enterprise policy 'extension and make your system secure.
If a Chrome user will try to remove the malicious extension, They will see
on the Chrome’s extension page the following message next to the
unwanted extension, and underneath there will be a message that will
say: “This extension is managed and cannot be removed or disabled“.
Cyber criminals are using the “Installed by enterprise policy” because the malicious extension that are installed with this policy cannot be remove by Chrome users by simply clicking the Trash Can icon.
![[Image: Installed by enterprise policy in Google Chrome]](http://malwaretips.com/blogs/wp-content/uploads/2014/02/Installed-by-enterprise-policy-Chrom.jpg "Installed by enterprise policy in Google Chrome")
Cyber criminals are using the “Installed by enterprise policy” because the malicious extension that are installed with this policy cannot be remove by Chrome users by simply clicking the Trash Can icon.
How to remove “Installed by enterprise policy” Chrome extension (Virus Removal Guide)
1.To remove enterprise policy extension registry entries with Adwcleaner.exe
Here is the proper step-by-step guide to remove any adware from registry, please follow the steps.1. Download AdwCleaner from the below link.
Download: AdwareDownload Link
- Run that downloaded file (Adwcleaner.exe).
- When you get it started, click on scan button to search the enterprise policy extension files and registry entries (As shown below screenshot).

- When scanning process will be finished, click on Clean button to delete all the enterprise policy extension and registry entries (as shown on below screenshot)

2.To remove enterprise policy extension registry entries with Mannual steps
Remove rogue extension/PUP related programs from your computer using the Add/Remove Programs control panel (Windows XP) or Uninstall a program control panel (Windows 7 and Windows 8).
Go to the Start Menu. Select Control Panel → Add/Remove Programs.
If you are using Windows Vista or Windows 7, select Control Panel → Uninstall a Program.

If you are using Windows 8, simply drag your mouse pointer to the right edge of the screen, select Search from the list and search for "control panel".
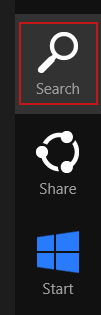
Or you can right-click on a bottom left hot corner (formerly known as the Start button) and select Control panel from there.

3. When the Add/Remove Programs or the Uninstall a Program screen is displayed, scroll through the list of currently installed programs and remove the following programs:
- ggrreatsaver
- SNT
- WS-Enabler
- WS-Supporter 1.80
- YoutubeAdBlocker
- UTuBerAodBlOacKeoR
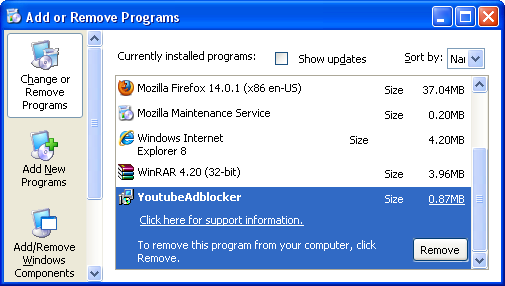
If you are using Windows Vista, Windows 7 or Windows 8, click Uninstall up near the top of that window. When you're done, please close the Control Panel screen.
Remove extensions "Installed by enterprise policy" from Google Chrome:
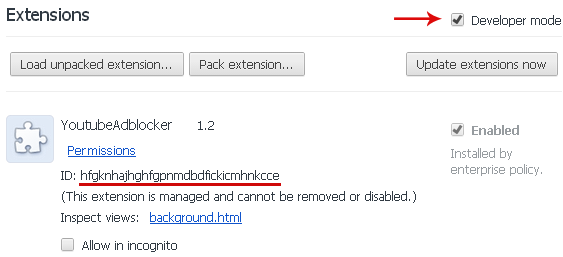
1. Click on Chrome menu button. Go to Tools → Extensions.

2. Enable Developer mode and take note of the unwanted extension ID shown below the extension title. Close Chrome browser.
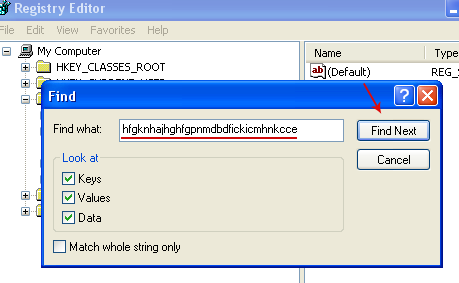
3. Open the Registry Editor (regedit.exe).
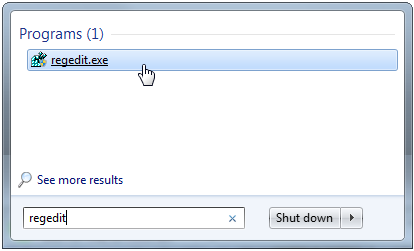
4. Go to Edit → Find Next or hit Ctrl+F3. Enter the ID of the unwanted extension and click to find registry key associated with it.
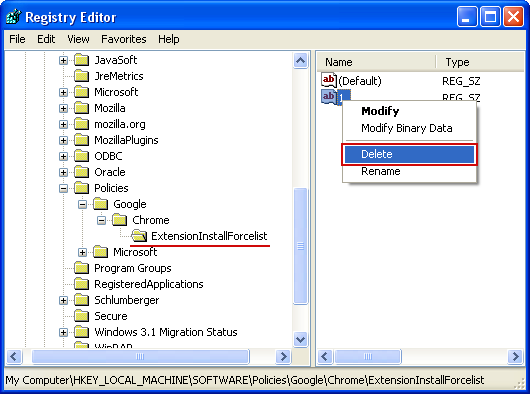
5. Remove the registry key which has a Data value the same as the extension's ID which you noted or saved above (likely 1). Right click on the registry key and select Delete. Accept the warning by selecting Yes. Close Registry Editor.
HKEY_LOCAL_MACHINE\SOFTWARE\Policies\Google\Chrome\ExtensionInstallForcelist
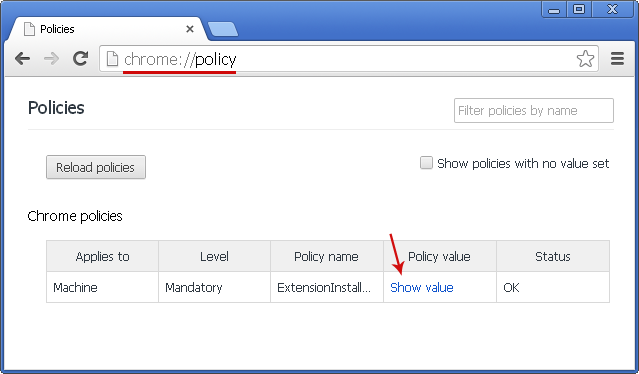
6. Open Chrome browser once again and navigate to chrome://policy/. Click Show value under Chrome policies.
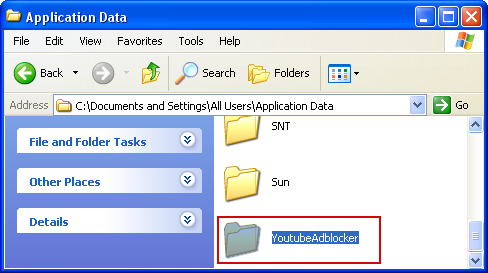
7. As you can see there's a path on your computer pointing to an extension update file. It is very important find the folder with the ID of the unwanted extension and delete it. Otherwise, it can reinstall itself.
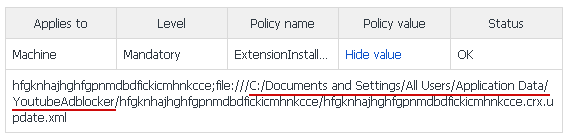
In my case it was located in a folder named YoutubeAdblocker. Yours will be different of course. Delete the entire folder.
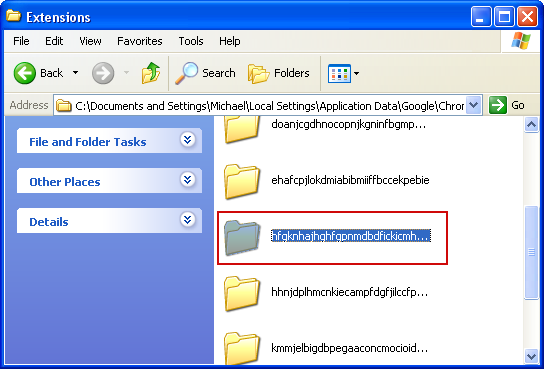
8. Unwanted extension’s files are stored in Chrome's default extensions folder as well. You need to delete the directory corresponding to the noted ID.
Windows Vista/7/8 users: %LOCALAPPDATA%\Google\Chrome\User Data\Default\Extensions
Windows XP users: %USERPROFILE%\Local Settings\Application Data\Google\Chrome\User Data\Default\Extensions
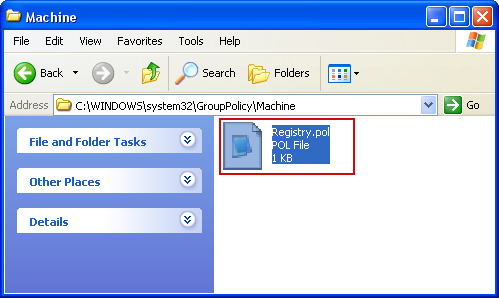
9. Finally, navigate to C:\Windows\System32\GroupPolicy\Machine (alternatively C:\Windows\System32\GroupPolicy\User).
Look for Registry.pol or other .pol files that reference the extension ID. To do so, simply open the file with Notepad. If it's the file you are looking for, delete it.
10. Last but not least, scan your computer with recommend anti-malware software. As I said, rogue browser extensions come bundled with adware and even spyware. Make sure you PC is clean.
Scan your computer with Malwarebytes
1. Download Malwarebytes Anti-Malware Free, then double click on it to install it.

2. Update online Virus Definition


3. Tick mark on “Perform quick scan” then click on Scan

You can find information about health and fitness here
https://fitclap.in/


super useful. thank you!
ReplyDeleteI'm glad ..it worked :)
ReplyDeleteWow. Great! :)
ReplyDeletethis was awesome..thx!
ReplyDeleteThank you bro...
ReplyDeleteSensacional. Profundo, com várias alternativas de soluções. Perfeito. Viva o trabalho voluntário e a ação solidária!
ReplyDelete